Design to live faster with Framer
Ghost CMS is a popular platform for bloggers and content creators, known for its simplicity and elegant design.
Using PM2 for process management in Ghost CMS provides several benefits.
Firstly, PM2 allows for easy process monitoring, enabling users to keep track of their Ghost CMS instances and quickly identify any issues.
Additionally, PM2 offers automatic restarts in case of crashes, ensuring GhostCMS remains operational without manual intervention.
Lastly, PM2 provides a centralized dashboard for managing multiple Ghost CMS instances, simplifying management for bloggers and content creators.
However, managing the Ghost process can sometimes be a challenge, especially when it comes to stability and efficient resource utilization.
Because I run Ghost on shared hosting, I use PM2.In shared hosting, I can't take advantage of systemd since it requires superuser permission.
Understanding PM2
PM2 is a production-ready process manager for Node.js applications.
It provides robust features, including automatic restarts, load balancing, and monitoring.
By leveraging PM2's capabilities, you can streamline your Ghost CMS process management and ensure seamless operation.
Without PM2, managing the Ghost CMS process can be time-consuming and inefficient. You would need to manually monitor the process, restart it in case of crashes, and manage multiple instances separately.
Adding PM2 to the Ghost Installation
In this tutorial, we will not cover Ghost installation. Check out my post if you want to know how to install Ghost on shared hosting:
To begin, let's go through the installation and setup process for PM2. Start by opening your terminal and running the following command in your Ghost installation folder:
npm install pm2Create ecosystem.config.js file inside the Ghost installation folder. Then copy-paste this code:
module.exports = {
  apps : [{
    name   : "ghost",
    cwd : "/var/www/html/ghost",
    script : "./current/index.js",
    env: {
       NODE_ENV: "production"
    }
  }]
}
Don't forget to match the cwd value with your Ghost installation folder path. Then save it.
Managing Ghost CMS with PM2
Now that PM2 is up and running, let's explore some essential commands for managing your Ghost CMS process. Here are a few useful ones:
# Start all applications
npx pm2 start ecosystem.config.js
# Stop all
npx pm2 stop ecosystem.config.js
# Restart all
npx pm2 restart ecosystem.config.js
# Reload all
npx pm2 reload ecosystem.config.js
# Delete all
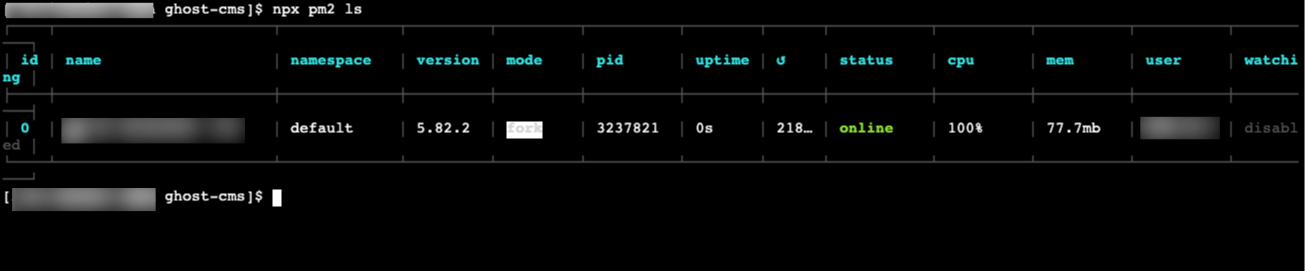
npx pm2 delete ecosystem.config.jsAfter you start the ecosystem.config.js file by using npx pm2 start ecosystem.config.js, you can see the pm2 process by using this command npx pm2 ls
Conclusion
By harnessing PM2for Ghost CMS process management, you can elevate your blogging experience to new heights.
With automatic restarts, advanced configuration options, and comprehensive monitoring, PM2 simplifies Ghost CMS management.
Alternatively, you can also use Forever, another popular process manager for Ghost CMS.
Forever offers similar features such as automatic restarts and monitoring, allowing you to efficiently manage your Ghost CMS installation and maximize its performance. Explore both PM2 and Forever to find the process manager that perfectly suits your needs.