Design to live faster with Framer
Using Ghost CMS for blogging is awesome. It is fast, easy, and beautiful.
The Ghost CMS is aimed primarily at blogging with the possibility of a membership model. This would enable you to build a community and monetize your content.
You can use Ghost for free because it is open-source, but it has a fully managed infrastructure that you can use as well. See their managed Ghost plan.
When I made this blogging site, I decided all of my content would be in Ghost. In order to use Ghost as the headless CMS, I hosted it on my personal server.
The hosting I use is shared hosting, but it has NodeJs integrated.
Please note that all instructions in this tutorial should not be implemented in production. The reason for this is that we will be installing Ghost locally on the shared hosting server.
Ghost local purpose is for theme development, core Ghost development, or just want to try it out.
You will need a VPS server if you want Ghost (NGINX and MySQL) to run at its best features. A shared hosting environment will otherwise encounter user privilege issues.
You can install Ghost on shared hosting using cPanel by following these steps.
Setup NodeJs from cPanel
The following steps are for cPanel installations that already have the NodeJs feature. Otherwise, you will have to install NodeJs manually on your server.
NodeJs Software
Select Setup Node.js App in the node.js page click Create Application
Create NodeJs Application
On the Create Application page, you can set some configurations.
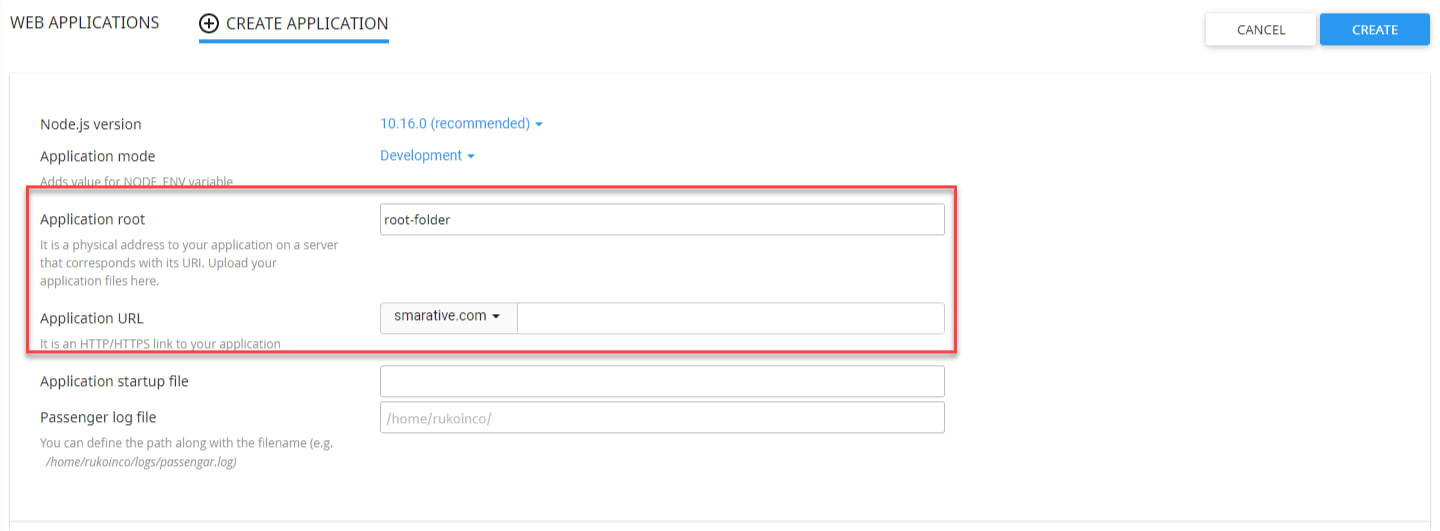
Fill the Application root with the folder location of the Ghost installation. Then set the Application URL. This URL will serve the Ghost.
Install Ghost-CLI in cPanel
Connect to the server through SSH then type the command below in the command line, don't forget to replace the account name.
#change your account name

source /home/<youraccount>/nodevenv/root-folder/10/bin/activate && cd /home/<youraccount>/root-folder- Now you are in the root folder of the virtual environment. Check current folder with
pwd. The reply should be something like :/home/<youraccount>/root-folder
Then now we can install the Ghost-CLI here by typing :
npm install ghost-cli@latest -gInstall Ghost CMS
To install Ghost CMS we need an empty folder. So, in the virtual environment we remove all file inside the Ghost folder by type this command:
rm -rf *Then install Ghost by simply type this command:
ghost install localYou can check the complete option command for installation on the official Ghost-CLI Install page.
Ghost local will automatically create a development config file by default. To create the production config file. Simply just copy config.developement.json with the new filename config.production.json. You can use this command to copy and rename:
cp config.development.json config.production.jsonYou can check at the root folder the that file config.development.json or config.production.json will be exist.

Open the config.production.json, then add your domain to the url field.
// config.production.json
...
"url": "https://your-domain.com", // add with your domain
  "server": {
 	"port": 2350,
 	"host": "127.0.0.1"
},
...
Hit save.
Also, make sure the port is in the same port on the .htaccess file of your domain folder.
// .htaccess

<IfModule mod_rewrite.c>
    RewriteEngine on
    RewriteRule ^(.*)$ http://127.0.0.1:2350/$1 [P]
</IfModule>- At
http://127.0.0.1:<port-number>/$1 [P]should same port number with the port on theconfig.production.json
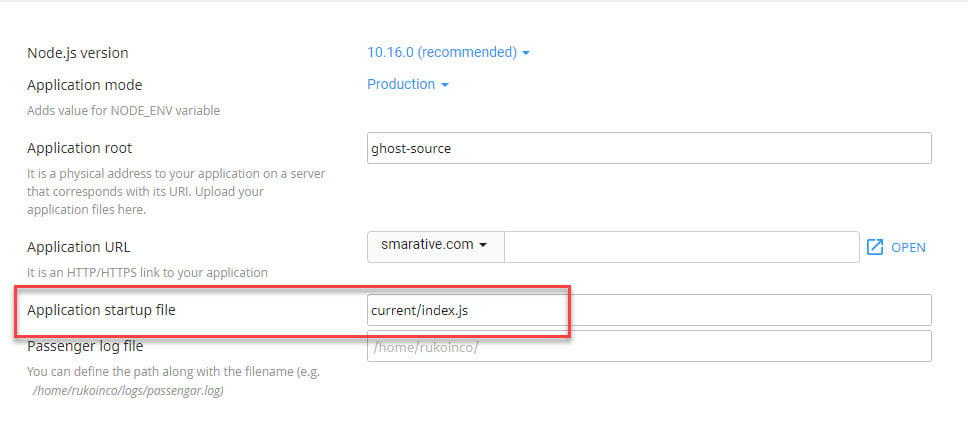
Back to the NodeJS on the cPanel page then add current/index.js in the field of Application startup file. This will point to where is the file to run the Ghost. Save then Restart the Application.
Open Ghost CMS admin panel
To open the admin panel you must add /ghost in the last URL. It will something like : https://your-domain.com/ghost
If you get 503 response page you just need to reload the page.
Now you can create an account then log in to the admin panel.
If you want better performance on dedicated hosting you can use 1-click-install Ghost on Digital Ocean.
You also might need to read this:
