
Design to live faster with Framer
Please note that this installation does not have WSL (Windows Subsystem for Linux). I always use a terminal from VS Code, so I don't need to change Windows (alt + tab) every time I need to do a command task.
Steps:
- ZSH on Windows installation that requires us to:
- Install Cygwin on Windows
- Set Up ZSH as the default terminal for Windows
- Set up ZSH as the default terminal for VS Code
- Install oh-my-zsh for ZSH on Windows
1. ZSH on Windows installation
First, download the Cygwin installer based on your Windows system (32bit or 64bit). Then, run it to install on your Windows.
In the installation process, you should make sure that the installation folder is c:\\cygwin64.
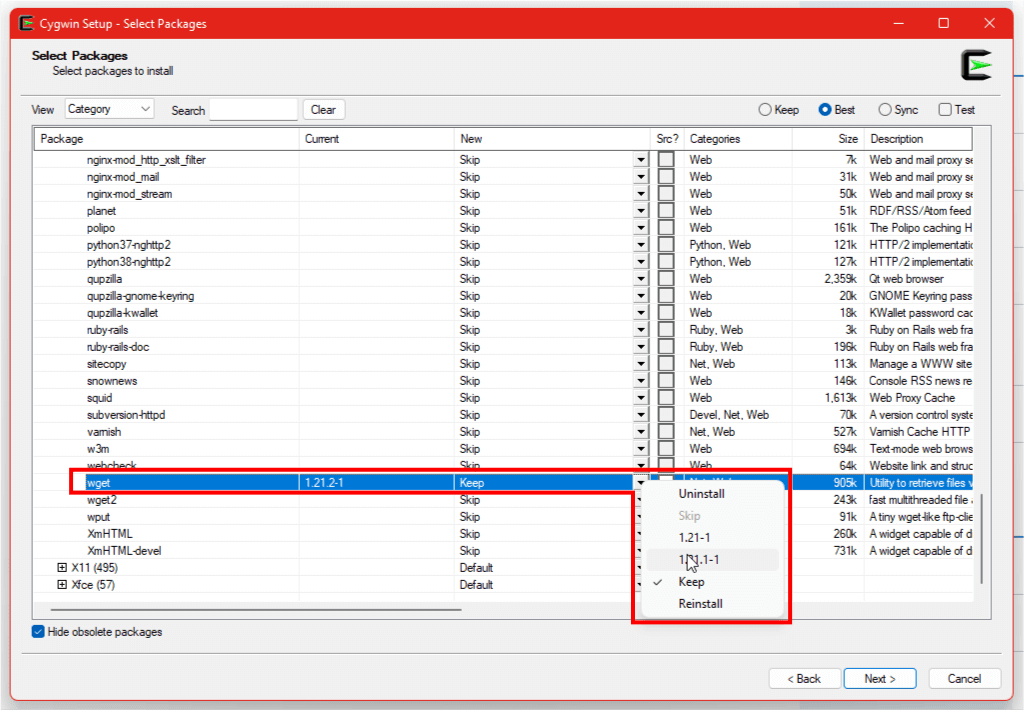
When the select packages screen is prompted, you should find wget by typing directly on the search input form or change to change to category view → expand (+) all → expand (+) web → find wget → from the new column, select the latest version → next.
After the Cygwin installation, we will set up Windows Terminal to use Cygwin bash as the default Windows Terminal.
To do so, you must open the setting.json in your Windows Terminal. Or open it from the setting screen.

{
// the rest configuration goes above...
  "defaultProfile": "{61c54bbd-c2c6-5271-96e7-009a87ff44ba}",
  "profiles": {
    "defaults": {

    },
    "list": [
      {
        "commandline": "powershell.exe",
        "guid": "{61c54bbd-c2c6-5271-96e7-009a87ff44bf}",
        "hidden": false,
        "name": "Windows PowerShell"
      },
      {
        "commandline": "C:/cygwin64/bin/bash.exe /bin/xhere /bin/zsh",
        "guid": "{61c54bbd-c2c6-5271-96e7-009a87ff44ba}",
        "hidden": false,
        "name": "Cygwin ZSH"
      },
// the rest configuration goes below...
    ]
  },

}
If you reopen the terminal, you should now use Cygwin's bash. You can check by running the command echo $SHELL to see what current is the command line.
Next, we will then use wget to install apt-cyg. Then use this apt-cyg to install zsh to the Cygwin.
To do so, on the terminal, run these commands:
wget rawgit.com/transcode-open/apt-cyg/master/apt-cyg
install apt-cyg /bin
apt-cyg install zsh git gdb dos2unix openssh chere vim
Relaunch the terminal, then try to check the version of the ZSH by running the command zsh --version, the version should be shown.
We are done installing Cygwin and ZSH on the Windows terminal. Let's make the ZSH to be the default terminal for VS Code.
2. Set up ZSH as the default terminal for VS Code
As I said earlier, I do this step because I enjoy running commands from VS Code. If you don't want to, skip this part and move to the oh-my-zsh installation step.
2.1 Cygwin Terminal Profile Integration
First, open the setting.json of your VSCode. Make sure you have this code:
"terminal.integrated.profiles.windows": {

  // Other integrations

  "Cygwin": {
    "path": "C:\\cygwin64\\bin\\bash.exe",
  }
},
"terminal.integrated.defaultProfile.windows": "Cygwin" // Set default
2.2 Add VS Code Plugin into Cygwin
To add the VS Code plugin, you open the .zshrc file that is located in your Cygwin user folder, ex: c:\cygwin64\home\[your profile].
Scroll and find plugins, and add vscode inside it. ex: plugins=(... vscode). Save it and relaunch the VS Code Terminal.
To check, kill any running terminal on VS Code then reopen it. Run command echo $SHELL or zsh --version like before.
We have the ZSH as the default terminal, the last is to install oh-my-zsh.
3. Install oh-my-zsh for ZSH on Windows
Go to the oh-my-zsh homepage to learn more about it. As you can see on their documentation, the installation is straightforward via wget.
You can just run the following command:
sh -c "$(wget https://raw.github.com/ohmyzsh/ohmyzsh/master/tools/install.sh -O -)"Wait until the installation is completed then you can relaunch the Terminal and oh-my-zsh should be there now.