
Design to live faster with Framer
This tutorial shows you how to integrate Slick Carousel to display category names lists into a WordPress website.
Here is what we will be going to create
What I use in this tutorial:
- Code snippets plugin
To inject code to the head, body even the Wordpress function.
- Child theme from any theme
This is because we will add CSS and JS file on the theme to maintain the site load speed. Prefer CDN? Slick Carousel Slider has it. - FTP access or File Manager plugin
For uploading Slick JS and CSS file into the child theme.
- Slick carousel slider
The library allows you to create carousels and carousel sliders using Javascript.

- Elementor Pro
Easy drag and drop the shortcode then adjust it through Elementor's custom CSS.


Add Slick Carousel Slider Files Into The Child Theme Folder
After we have already installed and activated the child theme. We will now upload the Slick carousel slider files into the child theme folder.
First, download the Slick file from its homepage. Unzip and you will see many files inside it.
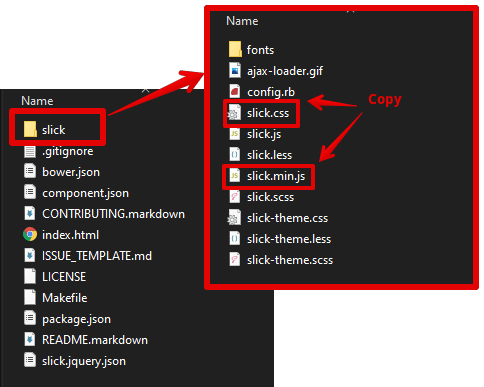
- Open the slick folder from the unzipped folder.
- Copy the
slick.cssfile then paste it to theassets/js/child theme folder and copy theslick.min.jsfile then paste it to theassets/js/child theme folder. Create the folder if not exist.
Assets theme folder location
themes/your-theme-name/ → Root of your theme
├── assets/
│   ├── css/
│   │   └── slick.css
│   ├── js/
│   │   └── slick.min.js
├── ...
Injecting Code Into WordPress
To make code injection easier and manageable, I prefer using this plugin. You can easily toggle on or off the code from this plugin.
Install and activate just like other plugins from add new plugin page of your Wordpress dashboard.
After the plugin is activated, now we create the snippet structure on the Code Snippet dashboard.

- Slick Shortcode - Category List
Create a shortcode that we will use later on the archive blog page. - Enqueue Scripts
To enqueue the JS and CSS file from the assets folder to the front end page. - JS Snippet - Body Inject
The Slick initialization script and add it before the body close tag.
Slick Shortcode Code Snippet
Add this code to the Slick Shortcode - Category List.
<?php
function add_category_list() {

	if ( (!is_front_page() && is_home()) || is_archive() ) {

	$args = array(
		'exclude' => '1', // Exclude 'Uncategorized'
		'title_li' => '',
		'hierarchical' => false,
	);

	?>

	<ul class="termlist">

		<?php wp_list_categories($args); ?>

	</ul>

	<?php

	}

}
add_shortcode( 'category_slider', 'add_category_list' );- Create a shortcode name it with
category_slider - Add class to the category list with
termlist. This class will be used to fire the slick carousel slider on the JS Snippet - Body Inject code.
Inject the Slick Script to the Front End
Add this code to the Enqueue Scripts.
function child_enqueue_styles() {

		$theme_url = get_stylesheet_directory_uri();

		wp_enqueue_style( 'slick-css', $theme_url . '/assets/css/slick.css', array(), null, 'all' );

		wp_enqueue_script( 'slick-script', $theme_url . '/assets/js/slick.min.js', array(), null, 'all' );

}
add_action( 'wp_enqueue_scripts', 'child_enqueue_styles', 15 );- Pick the JS and CSS files from the assets folder to be injected on the front end page. By using self-hosted files will reduce the load speed.
Fire Up the Slick Carousel
Add this code to the JS snippet - Body Injec
<?php
add_action( 'wp_footer', function() { ?>
<script>

	jQuery(document).ready(function( $ ){
	  $('.termlist').slick({
		variableWidth: true,
		  variableWidth: true,
		  arrows: true,
		  centerMode: false,
		  slidesToShow: 3,
		  slidesToScroll: 1,
		  infinite: true,
		  swipeToSlide: true,
		  prevArrow: '<div class="slick-prev slick-arrow"><i class="eicon-chevron-left" aria-hidden="true"></i></div>',
		  nextArrow: '<div class="slick-next slick-arrow"><i class="eicon-chevron-right" aria-hidden="true"></i></div>',
		  });
		});

</script>
<?php } );- We use
wp_footerto put the script before the body closing tag. - Set class
.termlistas the target element. - Set the setting value for the slick carousel slider.
Add Shortcode To The Blog Page
Be sure you already have post content and have its own category set.
I am using Elementor Pro to make it easy to create a blog page. You can Add New from the Wordpress Dashboard > Templates > Theme Builder. Choose Archive for the template type, then add the name "blog" on the template name field.
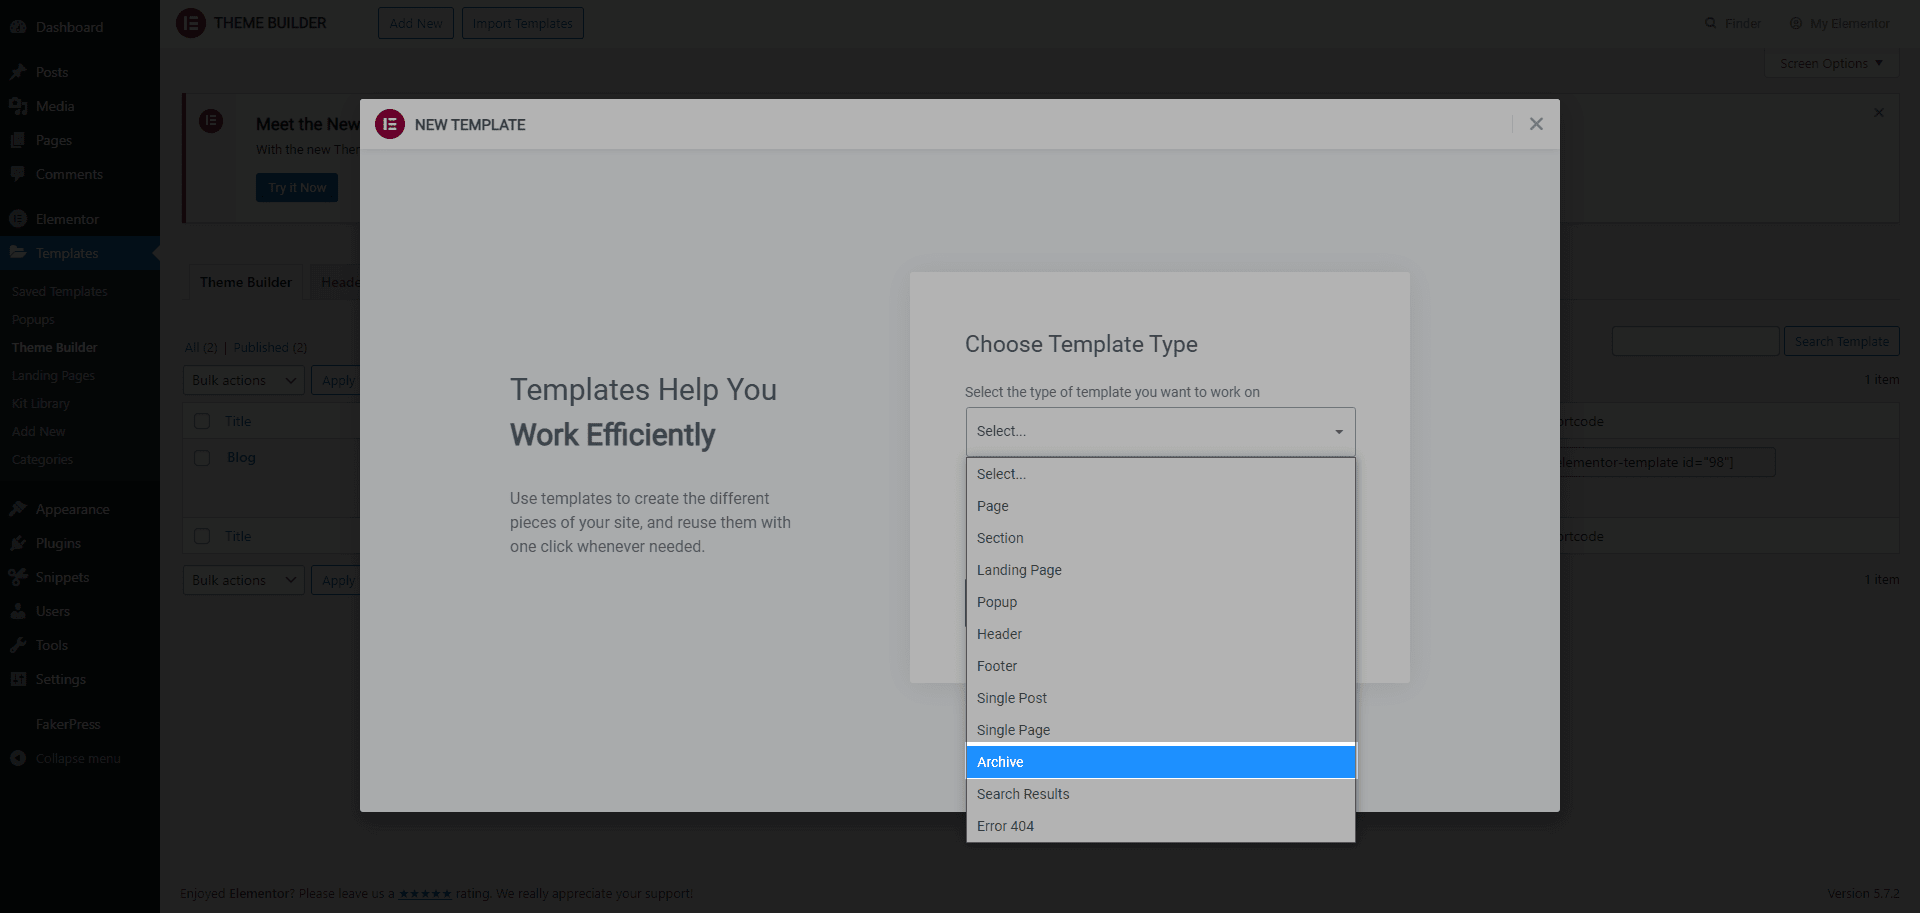
The Elementor editor will open after you hit Create Template button.
Drag the shortcode widget to the column area.
Then add [category_slider] to the shortcode field. And the category list should appear now.
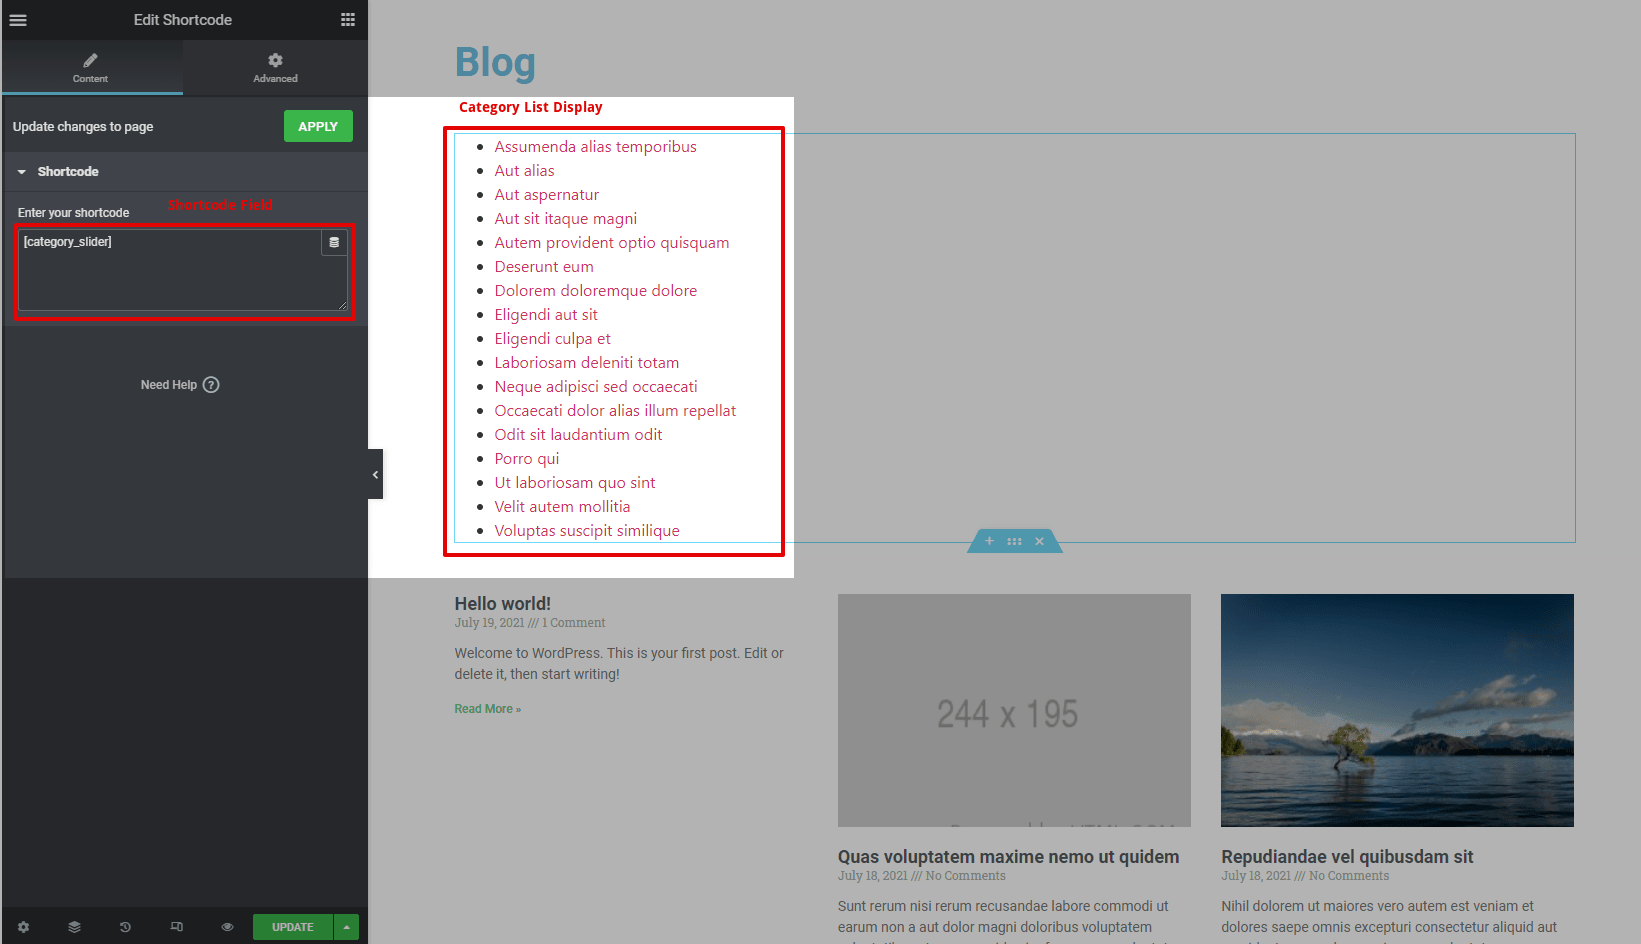
If the list still does not display, you try to set the display condition to the All Archived or Post Archive then save & close. The list should be displayed.
Don't worry about the look right now, we can start to style after this.
Add Style To The Carousel
One of the reasons why I like Elementor is that I can style the widget through its Custom CSS code field from the widget editor.
You can go to the advance tab of the widget editor, scroll to the bottom you will find the Custom CSS as the last of the list. But this feature is only available for the Pro version.
On this Custom CSS field add the following CSS code
/* Carousel */
selector .termlist {
    list-style-type: none;
    margin: 0 auto;
    padding: 0 20px;
}

/* Navigation Arrow */
    selector .slick-prev, .slick-next {
        cursor: pointer;
        position: absolute;
        display: inline-block;
        font-size: 20px;
        color: #fff;
        line-height: 1;
        font-family: FontAwesome;
        top: 5px;
        background-color: var(--e-global-color-accent);
        padding: 2px;
        border: 0;
    }

    selector .slick-next {
        right: -15px;
    }

    selector .slick-prev {
        left: -15px;
    }

/* Carousel Item */
    selector .termlist .slick-list .cat-item {
        padding: 5px 15px;
        background-color: var(--e-global-color-primary);
        margin: 0 5px;
        border-radius: 5px;
    }

    selector .termlist .slick-list .cat-item a {
        color: #fff;
}- Notice I am using color variable from the Elementor(i.e
background-color: var(--e-global-color-accent);). You can change the value as you preferred.
The other way if you are not on the Pro, you can utilize the HTML widget to add the style script.
The difference is only you must add <style> ... </style> code between the code above.
Hit the Update button the open your blog page https://yoursite.com/blog the carousel should be working now.