
Design to live faster with Framer
Images are one of the causes that give an impact on website performance. By that, the number of images on the page determines how fast and how large the site will load. The more images you have on the page, the bigger the site is and the slower it will load.
When it comes to website performance, SVG Graphic takes a huge advantage. They are typically smaller files in most cases.
This post shows how you can create a shape divider using SVG CSS-background for the Elementor pages. However it is likely that you can use it with any other website builder or just on basic of HTML-CSS .
Previously I worked on a project for a brand with a fun, pop-inspired graphical style. These graphics challenge me to integrate them as section transitions for almost whole pages.
Here is how my fun step implementing SVG code to the website (Elementor in this case).
The Tools
The following are two of the tools I use to create ready-to-use SVG code.
SVG Export Figma
I used Adobe XD as my default UX/UI design tool previously. But Figma has recently become my hero for completing my tasks quickly and efficiently.
With its growing community, Figma now has convenient tools, templates, and plugins.
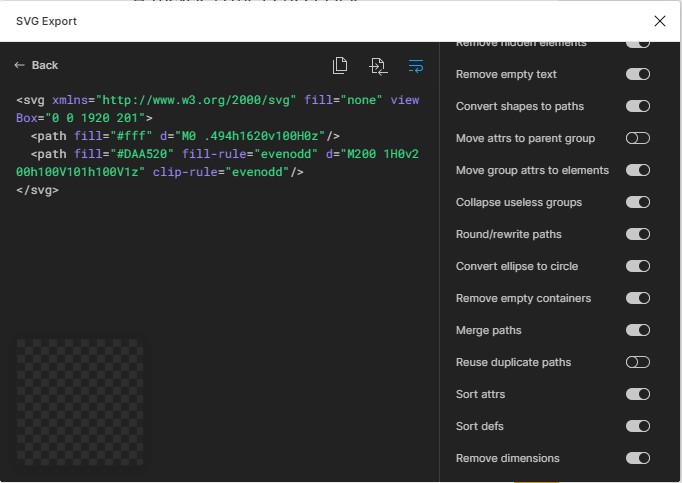
In this process of creating custom SVG shape dividers, I used the Figma called SVG Export. On the plugin's page, it's stated that SVGO is used for its optimization.
You can use many functions in this SVG Export plugin like code generation and optimization features. I have searched for a tool like this before, without having to export the file, save it on my drive, and then open it with the code editor to make the edit.
URL-Encoder SVG generator
There are several ways to implement SVG images in CSS and HTML. One of those methods is attaching the encoded code of SVG as a background image in the CSS. For this website project, I will use this method to implement SVG graphics.
Check this URL-Encoder generator for SVG, it allows the user to easily encode SVG code as well as CSS code.
The Simple Steps
Here are the steps I follow:
#1 SVG Export From Figma
On the final design of the Figma file, we can just open the SVG Export plugin. If you select the graphic elements, the code will automatically be generated.
As I will use the graphic element as the shape divider, I have to turn on the "remove the dimension" feature. By doing so, the SVG graphic can maintain the same ratio while the screen scales down.
#2 SVG CSS Code Ready
By copying the exported code then paste it to the "Convert SVG" field on the generator. You will see the CSS background-image syntax.

#3 Add The Generated Code to The Elementor Custom CSS
As I mentioned earlier that in this project is using Elementor. The pro version enables us to add Custom CSS on widgets or containers.
For this case of the project, I intend to add a shape divider at the top and the bottom of the container. My choice turned out to be pseudo-element methods. The use of ":before" for the top and ":after" for the bottom.
Screenshot for the section
The code for the top and bottom graphic elements.
/* Top Shape Divider */
selector:before {
    content: url("data:image/svg+xml,%3Csvg xmlns='http://www.w3.org/2000/svg' fill='none' viewBox='0 0 1920 201'%3E%3Cpath fill='%23fff' d='M0 .494h1620v100H0z'/%3E%3Cpath fill='%23DAA520' fill-rule='evenodd' d='M200 1H0v200h100V101h100V1z' clip-rule='evenodd'/%3E%3C/svg%3E%0A");
    width: 100%;
    overflow: hidden;
    left: 0;
    top: -1px;
    line-height: 0;
    position: absolute;
}

/* Bottom Shape Divider*/
selector:after {
    content: url("data:image/svg+xml,%3Csvg xmlns='http://www.w3.org/2000/svg' fill='none' viewBox='0 0 1920 100'%3E%3Cpath fill='%23F40' d='M1720 0h200v100h-200z'/%3E%3Cpath fill='%23fff' d='M0 0h200v100H0z'/%3E%3C/svg%3E%0A");
    width: 100%;
    overflow: hidden;
    left: 0;
    bottom: -1px;
    line-height: 0;
    position: absolute;
}- The most different to control between top and bottom only at the
topandbottomproperties. - The
selectorwill automatically be picked by Elementor for the associated id of the section.
Custom CSS is only available in the Pro version of Elementor. In some cases, the built-in style control is not enough to accomplish the desired design. When it comes to the need for complex to style customization, this feature is essential.


That is how my process creates a custom SVG shape divider then implements it in the Elementor section.
Please note that, if you have a complex graphic, the SVG code will also have a long line of code. That means the URL-Encoded also will be long if we put it to the CSS.
You might also like: